DIY: Build Your Home Bouldering Wall Step by Step
DIY: Build Your Home Bouldering Wall Step by Step
Are you thinking about building your own home bouldering wall? Great idea! In this guide, we'll show you step by step how to do it. We'll go through material selection, necessary tools, construction basics, and hold placement together. Whether you have a large garage or just a small corner in your living room, this guide will help you move toward your dream home wall.
What You'll Need
Materials
- KVH wooden beams of various dimensions (6x10 cm, 4x12 cm, 4x6 cm) – for the load-bearing structure
- Plywood - minimum 15 mm thickness for the main panel, 12 mm can also be useful for smaller connecting elements
- Wood screws - construction screws of various lengths, we recommend torx drive
- Chemical anchors or quality dowels – for anchoring to wall/ceiling
- M10 bolts and T-nuts – for mounting holds
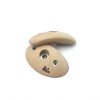
- Climbing holds – for home walls we recommend wooden holds
- Crash pads or mattresses – you can arrange several crash pads next to each other, but the price can be quite scary. For starters, several older mattresses will suffice, which can often be obtained for free pickup.
- Pulleys, winch and hinges - in case of building an adjustable wall.
Tools
- Cordless drill/screwdriver, ideally two, one for pre-drilling, one for actual screwing
- Electric saw - ideally a "miter saw" for cutting precise angles and a "circular saw" with guide for longer cuts
- Level and square
- Tape measure and pencil
- Wood drill bits of various thicknesses (10 mm for T-nuts, 4 mm for pre-drilling screw holes)
- Concrete drill bit (if anchoring to wall)
- Carpentry clamps, larger table saw, belt sander for finishing cuts, etc. can also come in handy
Step 1: Planning and Measuring
Before you start buying or cutting anything, you mainly need a plan:
- Measure available space – height, width, depth. Draw the wall on the floor and check for potential collisions with opening doors, cabinets, windows, etc.
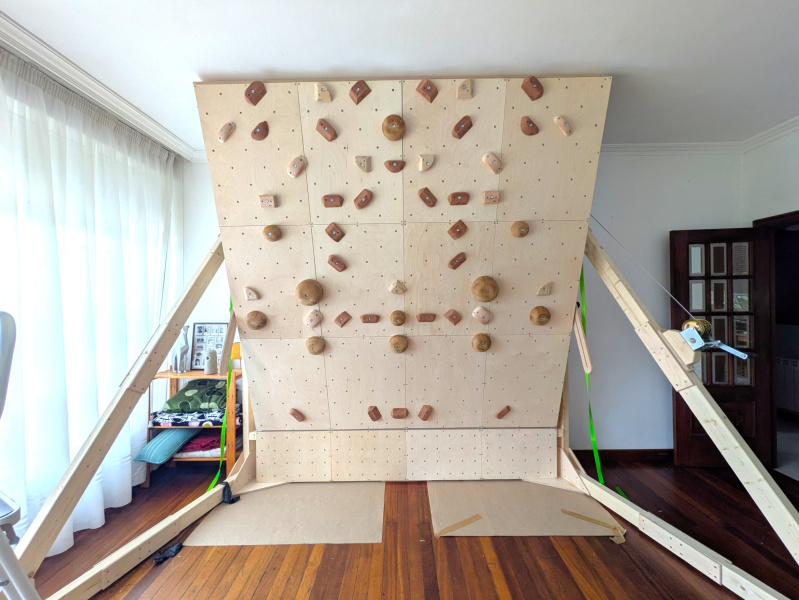
- Determine wall angle – if you're building a fixed wall, don't be afraid of a larger overhang; for home training, an adjustable wall is of course ideal.
- Plan your kickboard - we recommend building at least a small (20 cm) kickboard. This will significantly increase the wall's variability, sit starts, etc.
- Draw a plan – dimensions of the structure, anchoring. You'll manage with pencil and paper, but it's definitely better to work in a 3D program. Several are available for free online, such as Sketchup.
- Check wall/ceiling load capacity – make sure the structure you're anchoring to can really handle it. If in doubt, you'll have to build a freestanding wall or just get a ready-made adjustable one.
Tip: If you can't anchor to the wall, consider a freestanding structure.
Step 2: Material Preparation
Construction from KVH Beams
Cut KVH beams according to the plan:
- Vertical supports – from floor to ceiling (or according to wall height)
- Horizontal crossbeams – for reinforcement (space every 60-80 cm)
- Diagonal braces – for overhang (if you're making an angled wall)
Plywood Preparation
Cut plywood into panels according to wall size. Standard plywood dimensions are 250 x 125 cm, but you might find it easier to work with smaller panels. We use 60 x 80 cm dimensions on our walls.
Important: Before mounting, drill holes for T-nuts. The standard hole grid is approximately 20 x 20 cm. There will be quite a lot of holes and doing it manually will take quite a while. Alternatively, try asking a company that can make a precise hole grid on a CNC machine.
Step 3: Building the Structure
Mounting the Load-Bearing Frame
- Mark post positions on the floor and wall/ceiling according to the plan.
- Mount the bottom frame – horizontal beam on which vertical posts will be anchored.
- Set up vertical posts – check with a level that they are perfectly vertical.
- Attach the top frame – horizontal beam at the top for stability.
- Add crossbeams – horizontal beams between posts for reinforcement.
- Anchor to wall/ceiling – use chemical anchors or quality dowels.
⚠️ Safety first! The structure must be firmly anchored. If in doubt, consult with a structural engineer or experienced carpenter.
For Angled Wall (Overhang)
If you want a wall with overhang, add:
- Diagonal braces from the bottom part of the wall to the top part of the structure
- Kicker (bottom part that protrudes outward) – facilitates entry and adds to wall variability
Step 4: Mounting Main Panel and T-Nuts
Installing T-Nuts
- Drill holes in plywood according to chosen grid (10 mm wood drill bit).
- Place T-nuts from the back side of the panel into pre-drilled holes
- Lightly hammer with a rubber mallet so the prongs hold firmly in the plywood and the entire nut is hammered into the plywood.
Screwing on the Plywood
Screw the plywood to the load-bearing structure:
- Use 40 mm screws every 20 - 30 cm along all beams
- Screws should pass through the plywood and at least 30 mm into the beam
Step 5: Hold Placement
Now comes the fun part – placing holds!
Basic Placement Principles
- Hold density – for beginners more holds closer together, for advanced fewer and farther apart
- Variety of shapes – combine large jugs, edges, pockets, pinches of various sizes
- Zones by difficulty – bottom part easier holds, harder towards the top
Recommended Number of Holds
For a 2.4 x 2.4 meter wall (5.76 m²) we recommend:
- minimum 20 holds per m², that's the absolute basics
- 30 - 40 holds for full training to utilize the wall's full potential
Wooden holds are an ideal choice for home walls – they're easier on your fingers, don't get crushed, and look great. Check out our selection of wooden holds.
Mounting Holds
- Choose position for hold according to your route plan
- Place hold on M10 bolt (usually 30-60 mm)
- Tighten with Allen key – firmly, but don't overtighten
Step 6: Safety
Crash Pad
Always place crash pads or mattresses under the wall. Recommended thickness minimum 20 cm. The pad should cover the entire landing zone.
Tips for Getting Maximum from Your Bouldering Wall
- Rotate holds – every few weeks change the placement of at least some holds
- Color coding – use colored stickers under holds for different route difficulties
- Mirror on wall – watch your technique while climbing
- Good ventilation – important for drying holds and pleasant environment
- Go easy on chalk to reduce dust in the room, we recommend using liquid chalk
How Much Will It Cost?
Assuming you have all the tools. Approximate material costs for a 2.4 x 2.4 meter wall:
- Wood (KVH + plywood): €400 - €800
- Anchoring material and screws: €125 - €200
- T-nuts (100 - 300 pcs): €20 - €65
- Climbing holds (100 - 150 pcs): €850 - €2,100
- Crash pad: €400 - €850
Total: €1,200 - €4,000
A DIY bouldering wall is quite a large investment, but you'll save on gym entry fees and can climb whenever you want
Don't Have Time or Desire to Build Yourself?
Building a bouldering wall at home doesn't have to be rocket science. However, if you want to save time and avoid mistakes and dead ends, you can get a ready-made solution with simple "IKEA" style assembly. All our home climbing walls are designed for easy installation and maximum use of space.
##PRODUCT-WIDGETS-41076##
Conclusion
Building your own home bouldering wall isn't rocket science, but besides skill, time and good tools, it also requires careful planning.
Read more: Home Climbing Wall: How to Choose or Build One
Want advice on choosing holds or construction? Write or call us – we're happy to help! 🦙